Quick Time Events (or QTEs) refer to timed sequences in a game that require a specific response from the player within a set time limit. They were popularised by games such as Resident Evil 4 and Shemnue - the video below shows an example from the latter game that can be re-created using Adventure Creator.
In this tutorial, we'll create a simple QTE that requires a button on the keyboard to be pressed repeatedly within a time limit. If the player fails to press it, the game will end.
We'll begin by creating an on-screen prompt, to tell the player which key to press during the QTE. If we do this using Unity's UI tools, then we can animate it later. A more in-depth tutorial on using Unity's UI tools with Adventure Creator can be found here.
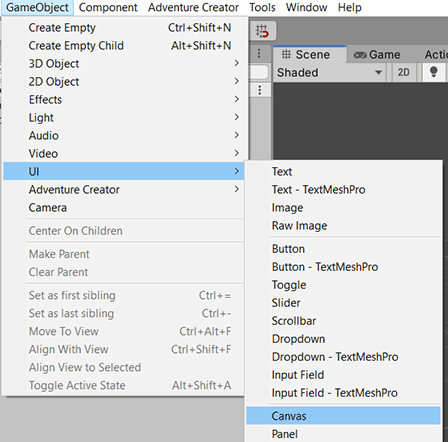
Begin by creating a new Canvas - from the top toolbar, choose GameObject → UI → Canvas.
Rename it QTE_Canvas, and attach an Image GameObject to it as a child, from the same toolbar.

Select the Canvas, and set it's Ui Scale Mode to Scale With Screen Size. So that we can fade it easily, attach the Canvas Group component. Then resize and re-style the Image to something appropriate - something like this should do just fine:

Prefab this new Canvas by dragging it into your Project window, and we're now ready to link it to Adventure Creator. Open the Menu Manager, and create a new Menu by clicking Create new menu. Rename it QTE prompt, and set it's Source to Unity Ui Prefab. A new pair of fields will appear at the bottom of the Menu's properties list: set the Linked Canvas to the QTE_Canvas prefab:
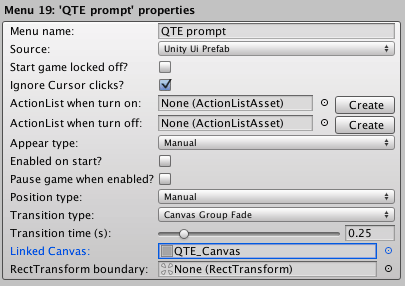
Since we'll be turning this Menu on and off with our QTE Action, leave it's Appear type as Manual. Set it's Transition type to Canvas Group Fade, and a Transition time of 0.25s.
Now let's define the button to be pressed in the Input Manager. Open it by choosing Edit → Project settings → Input from the top toolbar, and create a new Input Axis by increasing the Size value by 1. Rename this new axis Down, and set up the fields as follows:
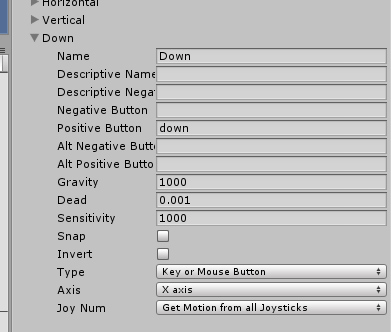
This maps the "down" key on the keyboard to the defined Input axis "Down".
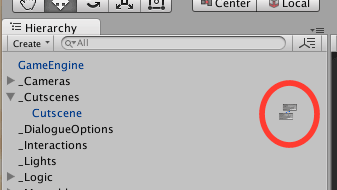
With our on-screen prompt and input button both made, we can now create our QTE. Using the Scene Manager, create a new Cutscene, and view it's ActionList Editor window - you access it either from it's Inspector, or by clicking the "node" icon beside it in the Hierarchy:
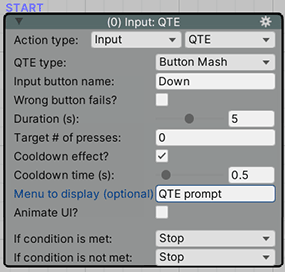
Change the default Action to Input: QTE, and set the QTE type to Button Mash. We want the player to have to press the Down input button we just created, so set the Action's Button name to Down.
We'll make this QTE quite easy, so set the Duration (s) to 4, and the Target # of presses to 5.
This means the player will have four seconds to press Down four times. But we'll also require that the player presses them in quick succession: if they leave it too long in between presses, they'll have to start over. We can implement this by checking the Cooldown effect? checkbox, and setting Cooldown time (s) to 0.5. This means that for every half-second that passes with no presses, the number of presses already registered will go down by one.
Finally, we'll want our new Menu to display for the duration of the QTE, so set the Menu to display As QTE prompt. The Action should now look like this:
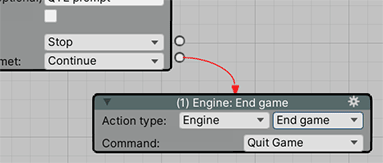
We now need to determine what happens when the player wins or loses this QTE. Create a new Action, of type Engine: End game, and link it from the QTE Action's If condition is not met socket.
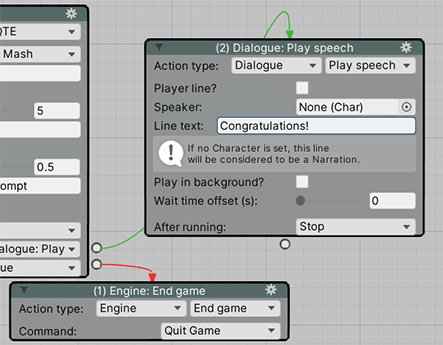
If the player succeeds, we'll display a message on screen. Create a new Action, of type Dialogue: Play speech, and link it from the QTE Action's If condition is met socket. Enter something appropriate into the Line text box:
Play the scene, and run the Cutscene to test the QTE. The Cutscene can be run at any time by clicking the Run button in it's ActionList Editor window.
The down arrow appears, and we're given a "win" message if we successfully press down enough times. However, it's not very visual: for one thing, we have no way of knowing how long we have to perform the button pressing! Let's address that next.