Adventure Creator has built-in support for basic options such as audio levels and subtitles. With a little custom scripting, it's possible to add further options for the user to configure.
Want to provide a "Graphic Options" menu? The New Game Wizard's "Templates" page provides one ready-made.
In this tutorial, we'll add the ability to change the speed that subtitles scroll. Subtitle-scrolling is a feature that can be enabled from the top of the Speech Manager: Scroll speech text. When this option is checked, the speed of scrolling can be adjusted with the Text scroll speed field that appears beneath:

To expose this as a Slider in our Options menu, we'll first need a place to store its value. We can do this with a Global Float variable. In the Variables Manager, click the Global tab, and then Create new Global variable. Name this variable Text scroll speed, set its Type to Float, and its Initial value to match that in the Speech Manager (currently 50).
Variable values are normally stored within save-game files. This, however, we'll want to store in our Options Data - so that it's part of the user's profile. We can do this by setting the Link to field to Options Data:

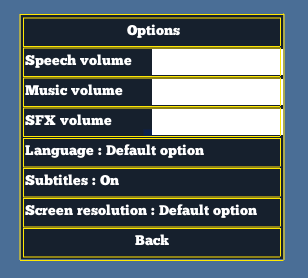
Now we're ready to amend our Options Menu to include a Slider that controls the value. This tutorial assumes you already have an Options Menu to work with - if you don't, you can simply copy one from the Default_MenuManager asset file, which looks like this:
Open the Menu Manager and select the Options Menu. Under the list of elements, choose an Element type of Slider and click Add new.
![]()
A Slider element will let the user set our Variable inside a range of values. Rename it ScrollSpeed, and re-style it so that it fits in with the rest of the menu:

As this Slider will be used to control our Text scroll speed variable, set the Slider affects property to Float Variable, and Global float var to Text scroll speed. Be sure to also set appropriate Min and Max values - here, we've set them to 30 and 120:

We can now use the Slider to control our Variable - but in order to have the Variable be linked to the scroll-speed, we'll need to rely on a short script that takes the value of the Variable, and applies it to the speed.
Create a new C# script named e.g. CustomOptions, and create a public function named Apply:
using UnityEngine;

public class CustomOptions : MonoBehaviour
{

	public void Apply ()
	{
		// Code will go in here
	}

}
To set the Speech Manager's Text scroll speed value at runtime, we'll need an API reference to it. We can get this by right-clicking the field's label, and choosing Copy script variable. This will place the following into the text buffer:
AC.KickStarter.speechManager.textScrollSpeedTo get the value of our Text scroll speed Global Float variable, we can use the following property:
AC.GlobalVariables.GetVariable ("Text scroll speed").FloatValueUsing these inside our Apply function, we get:
public void Apply ()
{
	AC.KickStarter.speechManager.textScrollSpeed = AC.GlobalVariables.GetVariable ("Text scroll speed").FloatValue;
}
When called, the Apply function will then read the variable's value, and apply it to the Manager field. The easiest way to call it, from anywhere in our game, is to attach it to a prefab, and reference it in an ActionList asset.
In any scene, create a new Empty GameObject, attach the new Custom Option component, and drag it into the Project window to make it a prefab. Name this prefab e.g. CustomOptions, and remove the original from the scene.
Next, still inside the Project window, right-click and choose Create -> Adventure Creator -> ActionList. Name this Update Custom Options.
Double-click the file to bring up the ActionList Editor window, and then change the first Action to the type Object: Call event. In the events box, click the + icon, and assign the CustomOptions prefab underneath the Runtime Only object field. In the function box beside it, select Custom Options -> Apply:

Be sure to assign the prefab file in this step - as opposed to the original script file - as events can only be received by components.
Return to the Slider element in the Options menu, and assign this list in the element's ActionList on change property:

As a final step, we also want to have the scroll-speed be set correctly when the game begins. We can do this most easily by assigning the same ActionList in the Settings Manager's ActionList on start game field:

And that's it! If we wish to add another option, we can do so by creating a Global Variable to store it, referencing that Variable in our Options menu, and updating the script's Apply function to make the correct change based on its value.