
Pixel Perfect Camera

Hi, I'm looking for help please ![]() been trying for the last few sessions over the last few days to try and get a pixel perfect camera working with AS. I've got the Pixel Perfect plugin and can get it to work with moderate degrees of success with Adventure Creator, but using the 9 verbs actions included demo, the 9 verbs always renders bigger than the 320x240 background.
been trying for the last few sessions over the last few days to try and get a pixel perfect camera working with AS. I've got the Pixel Perfect plugin and can get it to work with moderate degrees of success with Adventure Creator, but using the 9 verbs actions included demo, the 9 verbs always renders bigger than the 320x240 background.
I've messed around with the Main Camera's settings, with the AC Scene Camera's settings, PixelPerfect camera settings, etc. and am not entirely sure what I'm doing tbh or if I'm doing things correctly, I added the PixelPerfect component to the Main Camera.
I made the 320x240 background image's 'pixels per unit' 16, as I think it should be?
I have found this thread:
https://adventurecreator.org/forum/discussion/7918/pixel-perfect-camera-with-unity-2018-2-tutorial
https://adventure-creator.fandom.com/wiki/Unity_2018.2_Pixel-perfect_camera
It looks pretty complicated for me, and I wondered if there were a newer way to do this please?
I'm basically trying to see if I can recreate a classic 90s Lucasarts-type pixel art look, from the UI to the subtitles to the backgrounds and character animations.
Thank you for you advice.
Howdy, Stranger!
It looks like you're new here. If you want to get involved, click one of these buttons!
Comments
What are your AC/Unity versions, and are you using the Nine Verbs template available in the New Game Wizard?
As this is a visual issue, it's best to see screenshots of the problem if you can share them. I need to be clear on the exact behaviour you're getting.
Are you enforcing an aspect ratio? If your game is fixed at 320x240, you should set the ratio to 1.333 in the Settings Manager's Camera panel. The Verbs menu should stick to this if set.
Hi Chris, thanks. AC 1.81.6 and Unity 2022.3.45f1
I tried finding the scene I made with the included Nine Verbs template but not sure how to get it back again, made a demo project to experiment with, I might have done something to remove the 9 verbs UI.
Yes, I enforced the 1.33 aspect ratio. The 9 verbs fit in the window, but the backround 320x240 image was shrunken down quite a bit so it wasn't reaching the edges of the screen, like the 9 verbs UI was. With the pixel perfect camera component though, at least the background's pixels were clean and sharp.
I imagined that the pixel perfect camera I added to the MainCamera was maybe fighting with the Nine Verbs' UI's camera, and wondered if there were a way to get the nine verbs UI to be affected by the pixel perfect camera on MainCamera too?
Sorry, but I will need to see screenshots to be 100% clear on the issue. It sounds like two separate issues are being described here.
When an aspect ratio is enforced, you should get black borders around the edge of the Game window if the Game window's aspect ratio doesn't match the one specified in the Settings Manager. Is it the case that the background is properly lining up with these borders, but the UI isn't?
The Nine Verbs template, once installed from the New Game Wizard, should kick in automatically - it's not tied to any specific scene. Check that your game's Managers are all correctly assigned in the AC Game Editor window.
Try setting the VerbsUI's Canvas component's Render Mode to Screen Space Camera - at runtime, AC will set the Camera to the AC MainCamera by default. That may help have it use the Pixel Perfect effect. As the template involves copying this asset, however, make sure you modify the one used by your game - you can get this by selecting the "Verbs" menu in your Menu Manager, and then the "Linked Canvas prefab" field.
Hi Chris, this is the kind of thing I was trying to achieve:

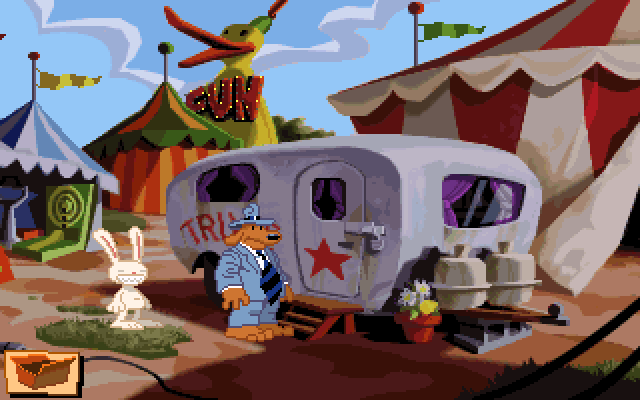
I managed to get the nine verbs imported and working, but the whole nine verbs 'window' was longer width than my background 320 x 240 room image when I had the pixel perfect camera on it. I'll try your recommendation.
Do you have any tips for setting up a scene to basically mimic the old-style Lucasarts games, please?
Another somewhat related question please - if I wanted to try and emulate a 'Sam & Max: Hit the Road' type of inventory box that's opened by clicking on it to open up the inventory, may I ask how to do this please? I've checked through the tutorials and manual but couldn't find anything relating to making an inventory button.
Thank you.
Thanks for the screenshots. I understand what you're trying to achieve - but I need to see how it currently looks in your project.
The instructions on the wiki page look good, though - particularly the notes about the use of the Custom Canvas Scaler component. The additional script mentioned (MainCamCopyInto) is not necessary in the current release.
Is this to say that it adheres to the enforced borders correctly when the pixel perfect camera is not in use? Until this is the case, I would say let's leave the pixel perfect camera out of this - it's another layer of complexity, and it's best to have all else working as it should beforehand.
The wiki page has some good tips so far as sprite setup goes. In addition:
If you have an Inventory menu with an Appear type set to Manual, then you can use the Menu: Change state Action to turn it on and off.
Having it turn on when clicking an icon in the lower-left is then just a case of creating a Button that runs this Action when clicked. You can get this behaviour quickly with the default interface by amending the "InGame" menu, and setting its Click type to Run Action List. You'd need to re-style it so that it uses an image instead of text, but functionally it should behave the same.
Back in the Inventory menu, you can either check Pauses game? to have the game pause while it's open. Otherwise, you can hide the InGame menu temporarily by running another Menu: Change state to lock it when the Inventory menu turns on (assign an "ActionList when turn on"). When a Menu is locked, it will not turn on even when its "Appear type" condition is met.
Hi Chris, thanks.
Messed around some more, redrew the bg and orb in pixel, going to try replace the demo character with an animated pixel guy to learn some more.
I agree that 'Pixel Perfect Camera' confuses things quite a bit, so I haven't added that. I find the subtitle text a liiittle blurry though on a pixel font, any idea how to crisp that up or change the filtering to none?
Will also try and see how to customize the 9-verb system.
Somewhat related question please Chris - if I wanted to have a unique frame-by-frame pixel animation involving 2 characters, eg Brian picking up and throwing the Orb, what's the best way to handle that? My guess is by making a custom sprite animation (animated in Aseprite) and timed with Unity's timeline, getting Brian and Orb as close as possible to the starting frame of that animation - hiding them maybe? And then playing that unique once-off animation, that won't be part of any of the character controllers? And then showing the characters again?
If you have an Atlas texture asset, you can try setting the Filter Mode in its Inspector. Otherwise, it may be a case of using a Render Texture to display the UI and/or game at a fixed resolution (though IIRC this is essentially what the PPC does).
Timeline's great whenever you want to sync up multiple animations together - so I'd recommend it particularly if you want to animate e.g. Brain and the orb at the same time.
You likely don't need to hide the original characters - an Animation track of the Player will override the Player's regular animation while it plays. If you're dealing with a Player prefab, however, you'll need to re-map the track's binding to the prefab asset (or child object, depending on what you're animating) in the Engine: Control Timeline Action. Remapping lets you dynamically control which object a Track affects at runtime - so that objects (such as the Player) can be spawned in at runtime and still be affected.