This tutorial is focused on taking a Mecanim-ready character model and integrating them into Adventure Creator. For more information about working with Unity's Animator (Mecanim) system, see here.
This tutorial makes use of the Character Pack: Free Sample animated character on the Unity Asset Store, but the steps involved work for any Mecanim-ready character model.
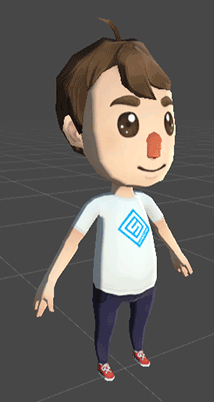
Regardless of whether you are making a Player or NPC, begin by dragging your character model or prefab into the scene. In the case of the asset mentioned above, this is the MaleFree1 prefab:
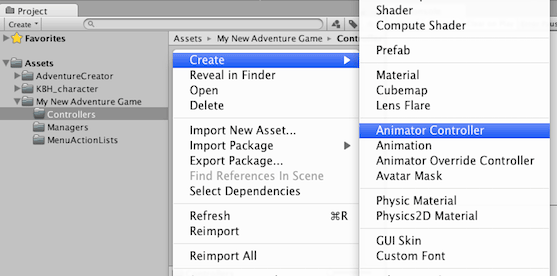
We'll need to supply an Animator Controller to drive the model's animations. If you don't already have one, you can create it in the Project window by choosing Create → Animator Controller in the toolbar.
Then assign it to your model by dragging it onto your character model's Controller field in the Inspector.
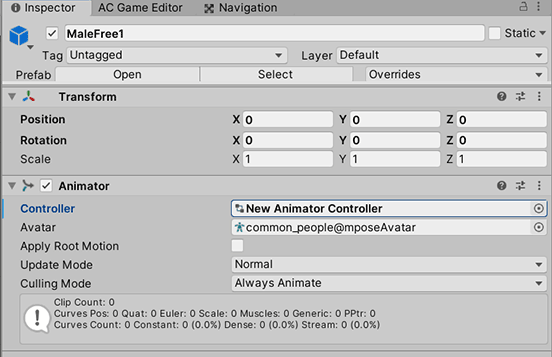
The animations used by the "Character Pack: Free Sample" asset do not rely on root motion, so uncheck Apply Root Motion in the Animator if you make use of them.
Let's now lay down the animations. Double-click the Animator Controller asset file to open the Animator window.
An AC Player or NPC typically uses a set of Idle, Walk, Run and Talk animations. For the "Character Pack: Free Sample" asset, we'll make use of the provided animations:
- common_people@idle (for idle)
- common_people@walk (for walk)
- common_people@run (for run)
- common_people@wave (for talk)
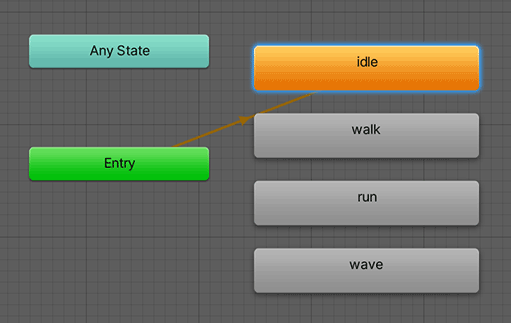
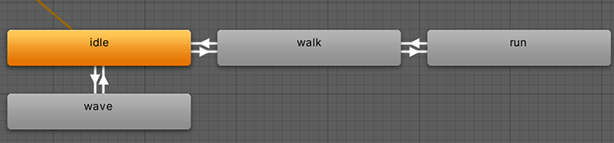
Drag these clips into your Animator window, and make "idle" the default by right-clicking on it and choosing Set as layer default state:
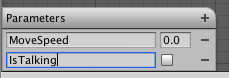
Define two Parameters: a Float called MoveSpeed, and a Bool called IsTalking. Leave them at their default values.
We'll use the MoveSpeed float to determine which of out the Idle, Walk and Run animations to play, but we want to keep our character still if the float is very small. Between the Idle and Walk animations, create two Transitions (right click on one, and choose the other, to make a Transition).
For the Idle → Walk Transition, set the Condition to MoveSpeed Greater 0.1.

For the Walk → Idle Transition, set the Condition to MoveSpeed Less 0.1

Similarly, create two more Transitions between Walk and Run. For the Walk → Run Transition, set the Condition to MoveSpeed Greater 1.

And for the Run → Walk Transition, set the Condition to MoveSpeed Less 1.

Finally, create two Transitions between Idle and Talk. For the Idle → Talk Transition, set the Condition to IsTalking true.

And for the Talk → Idle Transition, set the Condition to IsTalking false.

For all of these transitions, you probably want to also uncheck Has Exit Time. For smoother motion, you can also make use of a Blend Tree for the Idle, Walk and Run transitions.
Your completed Controller should look like this:
We're now ready to convert the object into a character. From the Scene Manager's Prefabs panel, choose either Player or NPC to bring up the Character wizard:

Assign the model's GameObject from the scene into the Base graphic field, give the character a name, and click Configure to move on.
On the Configuration page, we can choose the character's method of motion control. For example, rely on a Rigidbody, or a NavMesh Agent. For most purposes, however, the Character Controller option will suffice. Click Create when ready to have AC convert the model object into a character.
Adjust the character's Capsule Collider or Character Controller so that it spans the full height of the character:
At the top of the newly-added Player or NPC component, there'll be a section named Mecanim parameters. Here, we can tell AC which parameters within our Animator Controller that it can control. Set the Move speed float to MoveSpeed, and the Talk bool to IsTalking.
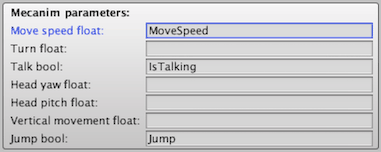
If we wanted, we could also supply a Turn float Parameter to integrate into the Controller. This float becomes -1 when the character turns left, and +1 when the character turns right.
Down in the Movement settings panel, we can define what values the MoveSpeed float will take when the Character moves. In our Controller, the Walk animation plays when the float is greater than 0.1, but when it's greater than 1 the Run will play instead, so set the Walk speed scale to 1, and the Run speed scale to 2.

The character is now ready to be placed in our game!

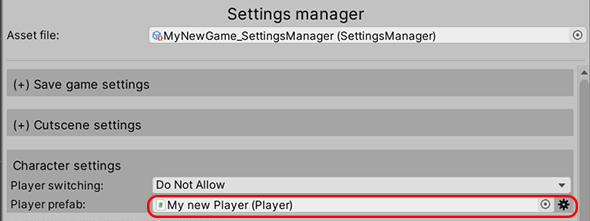
One extra thing, though: if this character is intended to be the default Player character, make them a prefab by dropping them into the Project window, and then assign that prefab into the Settings Manager's Player prefab field:
Doing so will cause the Player to be spawned whenever an AC scene is run - meaning you can safely remove the Player from the scene file itself.