The previous tutorial covered how to make a 2D character that uses the Sprites Unity system for animation. In this tutorial, we'll use the Sprites Unity Complex system - which offers more control over the way characters are animated, at the cost of being a little more complicated to work with. This option is also better suited to 2D skeletal animation.
The key difference between these two modes is that Sprites Unity works by naming convention, while Sprites Unity Complex uses Animator parameters and transitions.
The first few steps are the same as before: start by dragging your main sprite into the scene, making sure the asset's Pivot is set to Bottom, so that that GameObject's origin is around their feet. For reference, here's how the 2D Demo's Player character looks in the scene:
![]()
You can use your own graphics to follow along, but if want to use Brain's graphics, they can be found in AdventureCreator → Demo2D → Graphics → Sprites → Brain.
We'll make use of the Character Wizard to convert this sprite into a character. From the top toolbar, choose Adventure Creator → Editors → Character wizard.
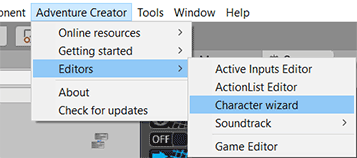
The wizard will pop up in a new window. Click Next, and give them a name. On the next page, select either Player or NPC, and then drag-and-drop the scene sprite into the GameObject field:
The object you assign here needs to be a GameObject in the scene - not the original sprite asset file.
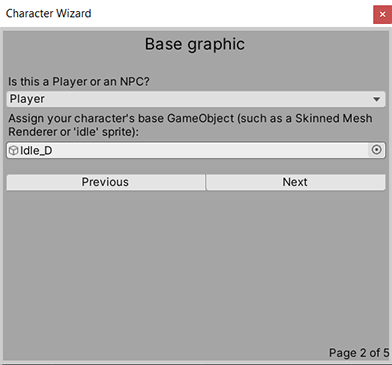
On the next page, leave the Animation engine field set as Sprites Unity Complex, and click Finish to create the character.
Our character now takes up three objects in the Hierarchy:
The root object now has a Player or NPC component, which the sprite is now parented to.
A Rigidbody 2D has also been added to the root, among other things. This is only necessary if you wish for the character to collide with other objects. If your game is point-and-click, you can remove this for better performance.
The Player or NPC component will have various settings for movement, but the default values should work fine. What you will need to configure next are the animation settings.
When the Animation engine is set to Sprites Unity Complex, standard animations are played by Animator parameters and transitions. AC is supplied with a set of parameters it can control, such as a Float for movement speed, and then transitions are used to move between animation states in the Animator Controller.
To keep things simple, we'll just have the character stand and walk in the four main directions. Under the Mecanim parameters panel in their Player or NPC Inspector, clear the Direction integer and Is talking fields fields:
![]()
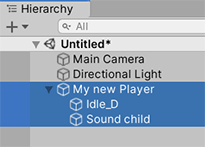
Based on the fields that remain, the character's movement speed will be set by a Float parameter named "Speed", and which direction they face will be set by a Float named "Angle". To make use of these, we'll need an Animator controller. We can create one by choosing Assets → Create → Animator Controller from the top toolbar. Then select the character's sprite child object, and assign this asset file into the Controller component of the Animator Inspector:
Note that the Animator doesn't necessarily need to be in the sprite child object - it can be on the root instead.
Open up the Animator Controller by double-clicking the asset file. We'll now need to define the two parameters listed in our character's Inspector. We can do this from the Parameters tab to the top-left of the Animator window. Click the + icon to create a Float named Speed, and an Float named Angle:
![]()
We'll now need to supply animations for standing and walking in the four main directions: up, down, left and right. This is all using Unity's built-in animation tools, so refer to Unity's own documentation if you're new to this topic.
If you're using Brain's sprites to follow along, you can find his animations in Adventure Creator → 2DDemo → Animations → Brain. He's got more animations than we'll be using, though, we only need four Idle and four Walk animations:
![]()
We'll now use the Animator's parameters to control which of these eight animations are played. There's a few ways we can do this: here, we're going to separate our "Idle" and "Walk" states into Blend Trees. Start by right-clicking in the main panel of the Animator window, and choose Create State -> From New Blend Tree. Select it, rename it to Idle in its Inspector, and then double-click it to open it up.
The key thing about system Sprites Unity Complex is that you can use the parameters in the way that suits you. AC will only control the parameters defined in the character's Inspector - how they are used is up to you.
We'll have the Idle Blend Tree store all of our Idle animations, and we'll rely on the "Angle" parameter to determine which one gets played. In the Blend Tree's Inspector, set the Parameter to Angle, and click the + icon to create four Motion Fields:
![]()
Then, assign the four Idle animations into the fields. If you're using Brain's animations, it'll look like this:
![]()
By default, Unity will assume the parameter's value ranges between 0 and 1. However, our Angle parameter is in degrees - so it'll range from 0 to 360, starting down and rotating clockwise. To have the animations react properly to the changing angle, uncheck Automate Thresholds, and set the down, left, up and right threshold values to 0, 90, 180 and 270 respectively:
![]()
Our Idle Blend Tree is now down, so click Base Layer at the top of the Animator. Right-click the Idle state and copy, then paste a duplicate beside it and name it Walk:
![]()
Double-click the new Walk Blend State, and replace each of the Idle animations with their Walk counterpart:
![]()
Return once more to the base layer of the Animator. We'll now need to have the Idle state transition to the Walk state when the character begins moving, and back again when they stop.
To do this, right-click on the Idle state and choose Make Transition. Click on the Walk state to complete the transition, represented by an arrow. Select the arrow to view the transition's properties in the Inspector.
Click the + icon at the bottom to create a new Condition, and set the Condition to Speed Greater Than 0.1. So that the transition kicks in immediately when this is the case, uncheck Has Exit Time. Since we're using sprite-based animation, we'll want the transition to be instant - so expand the Settings foldout and set the Transition Duration (s) to 0:
![]()
Repeat the process for the Walk to Idle transition, only setting the Condition to Speed Less Than 0.1.
Our character should now be able to stand and walk in each of the four directions. We can automate more animations like this by adding parameters to their Inspector - for example, a bool into the Talk bool field, which will be set to True whenever the character speaks.
For custom animation during interactions and cutscenes, we can either use the Character: Animate Action to change specific parameter values, or the Engine: Control Timeline Action to animate them using Timeline.
With animation assigned, our character is now ready to appear in a proper scene! One extra thing, though: if this character is intended to be the default Player character, make them a prefab by dropping them into the Project window, and then assign that prefab into the Settings Manager's Player prefab field:
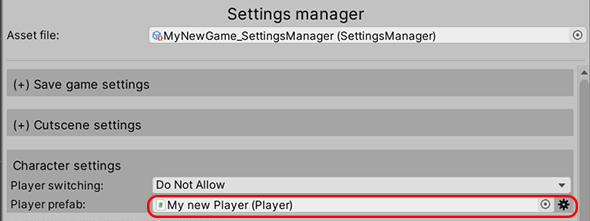
Doing so will cause the Player to be spawned whenever an AC scene is run - meaning you can safely remove the Player from the scene file itself.